> ## Documentation Index
> Fetch the complete documentation index at: https://vector.storyship.studio/llms.txt
> Use this file to discover all available pages before exploring further.
# Quick Start Guide
> Convert your first bitmap image to vector in just 5 minutes. Complete step-by-step tutorial from selection to editing your SVG.
 ## Your First Vectorization in 5 Minutes
Follow this guide to convert your first bitmap image into a beautiful, editable SVG vector. No prior experience needed!
**Before you begin, make sure you have:**
* ✓ Vectorized (AI Vectorizer) - Image Tracer installed ([installation guide](/getting-started/installation))
* ✓ At least 10 credits in your account ([buy credits](/support/credits-pricing))
* ✓ A bitmap image (PNG or JPG) in your Figma file to vectorize
Don't have an image? Use any screenshot or photo already in your Figma file to follow along.
***
## Step 1: Select Your Image
Click on any **bitmap/raster image** in your Figma canvas. The plugin works with:
* 🖼️ **Imported PNG/JPG files**
* 📋 **Pasted screenshots**
* 🎨 **Nodes with image fills**
* 📷 **Drag-and-dropped photos**
**What kind of images work best?**
* ✅ **Logos and icons** - Clean, simple shapes
* ✅ **Flat illustrations** - Limited colors, no gradients
* ✅ **Line drawings** - Sketches and outlines
* ⚠️ **Photos** - Work, but may need High-Fidelity preset
* ❌ **Text** - Better to use Figma text layers directly
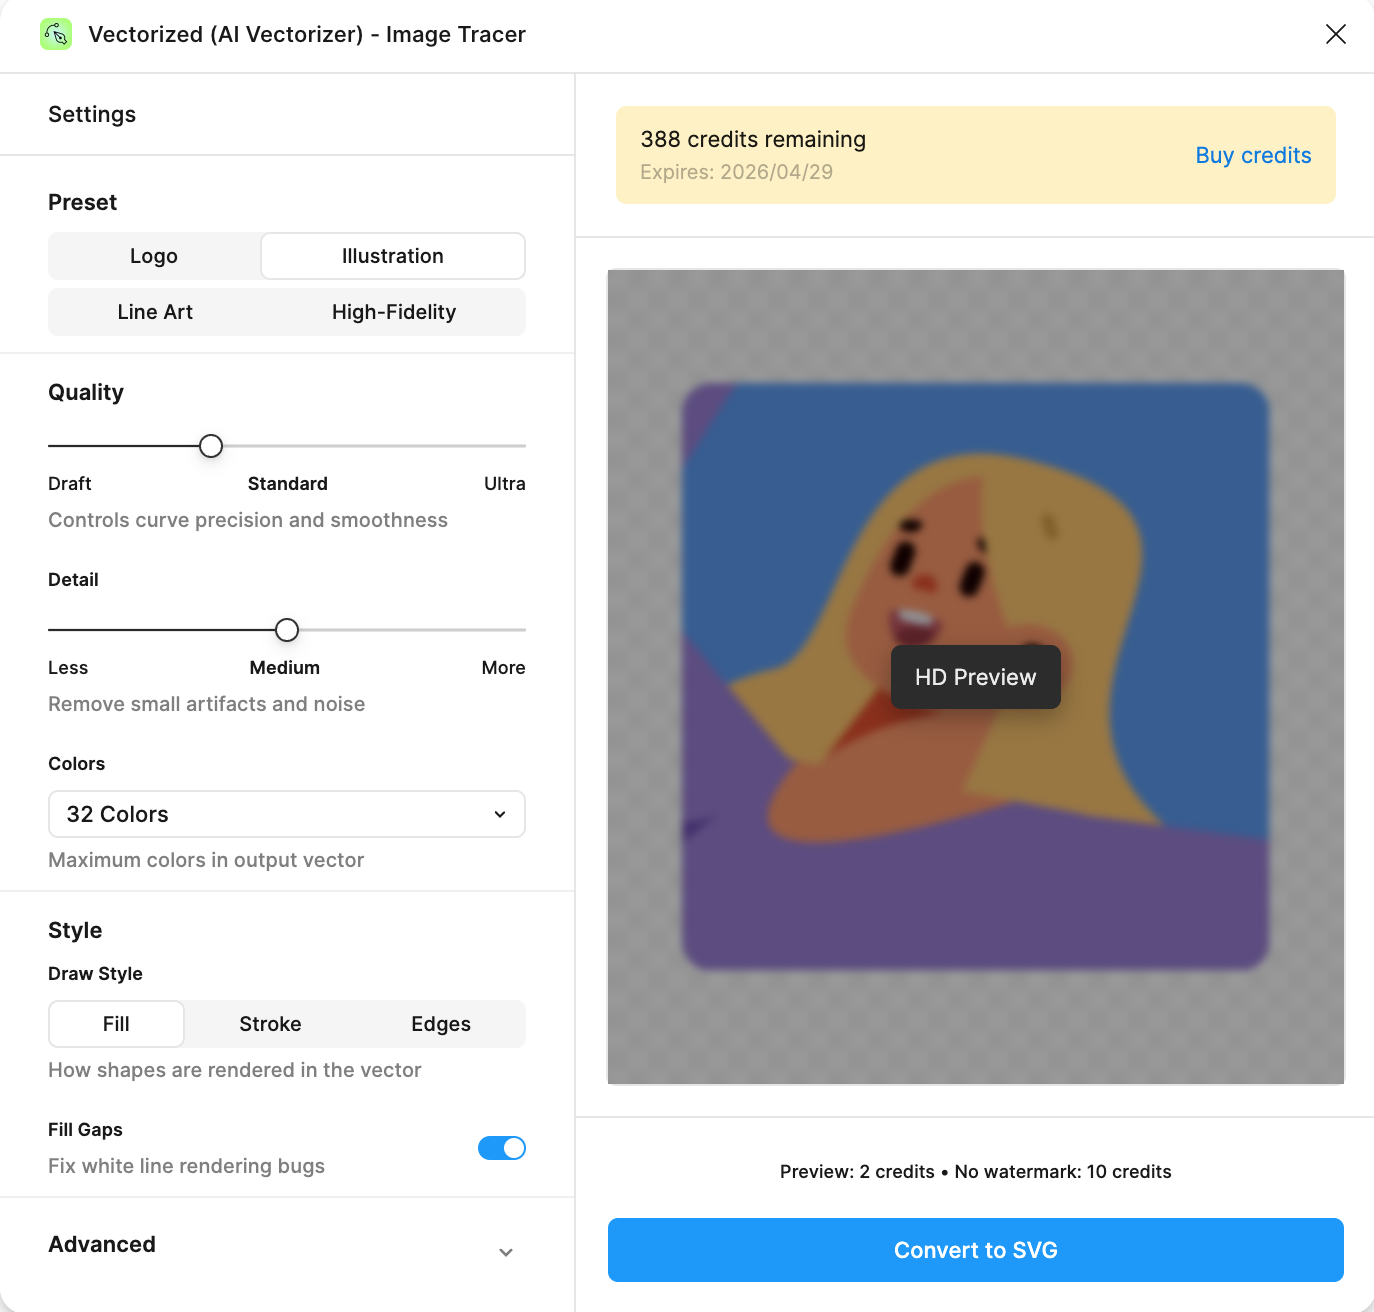
Once you've selected an image, the plugin automatically detects it. You'll see:
✓ Image preview appears in the plugin's canvas area (center-right)
✓ "HD Preview" button becomes active (changes from disabled to blue)
✓ "Convert to SVG" button is enabled at the bottom
✓ Settings panel remains available on the left
**Not seeing the image preview?**
Common issues and fixes:
* **No image fill**: Make sure the selected node actually contains an image (not just a solid color fill)
* **Image not loaded**: Wait for the image to fully load in Figma first
* **Wrong format**: Plugin works with PNG/JPG only (not SVG, PDF, or video)
* **Locked/Hidden layer**: Unlock and make visible
**Still not working?** Try:
1. Right-click the image → Copy
2. Create a new rectangle (`R` key)
3. Paste the image as fill (`Cmd/Ctrl + V`)
4. Select the rectangle
For best results, consider these quick optimizations:
If your image has a background you don't need, remove it before vectorizing:
* Use Figma's background removal tool
* Or use a service like remove.bg
* Clean backgrounds produce cleaner vectors
For sketches and line art:
* Adjust brightness/contrast in Figma
* Makes lines more defined
* Results in cleaner vector paths
Remove unnecessary space:
* Frame the main subject tightly
* Reduces processing time
* Focuses vectorization on what matters
These optimizations are optional! The plugin works great with raw images too. Feel free to skip if you're just testing.
***
## Step 2: Choose a Preset
Presets are optimized configurations for different image types. Pick the one that matches your image:
**Best for**: Brand logos, simple icons, badges, emblems
* Aggressive noise removal
* Limited colors (16)
* Clean, sharp edges
* Small file size
* Converting company logos
* App/web icons
* Simple graphics
* 1-5 main colors
**Settings**: Standard quality • Low detail (30) • 16 colors • Fill shapes
**Before**: Pixelated JPEG logo from client's website
**After**: Clean, editable SVG with perfect edges
**File size**: 240 KB → 12 KB (95% reduction!)
**Best for**: Flat illustrations, UI graphics, artwork, patterns
⭐ **Recommended for 90% of users - start here if unsure!**
* Balanced detail preservation
* Rich colors (32)
* Moderate noise filtering
* Optimal file size
* Flat design illustrations
* UI components
* Marketing graphics
* **Not sure which to pick**
**Settings**: Standard quality • Medium detail (50) • 32 colors • Fill shapes
**Before**: Flat illustration with multiple colors
**After**: Editable vector, all colors preserved, smooth shapes
**Perfect for**: Design systems, landing pages, presentations
**Best for**: Hand-drawn sketches, technical drawings, coloring pages
* Uses **strokes** (not fills)
* High precision
* Preserves fine lines
* Adjustable line weight
* Scanned sketches
* Wireframes
* Coloring book pages
* You'll add colors later
**Settings**: High quality • High detail (70) • 8 colors • **Stroke shapes**
**Before**: Scanned pencil sketch
**After**: Clean vector strokes, ready for coloring
**Bonus**: Adjust stroke width after conversion in Figma!
**Best for**: Complex artwork, detailed illustrations, photo-realistic images
* Maximum detail preservation
* Full color spectrum (256)
* Minimal noise removal
* Ultra-precise curves
* Complex illustrations
* Artistic pieces
* Quality > file size
* Other presets lose details
**Settings**: Ultra quality • Very high detail (80) • 256 colors • Fill shapes
**Important trade-offs:**
* ⏱️ **Slower**: 30-60 seconds processing time
* 📦 **Larger files**: 500 KB - 2 MB (vs 50-200 KB for Illustration)
* 🎨 **Harder to edit**: More complex paths
* 💰 **Same cost**: Still 10 credits
**Recommendation**: Try Illustration first, upgrade if needed!
**Still not sure which preset to choose?**
* Simple graphics (logos, icons) → **Logo**
* **Don't know / General use** → **Illustration** ⭐
* Lines only (sketches) → **Line Art**
* Very complex / detailed → Try **Illustration** first, then **High-Fidelity** if needed
**Pro tip**: Use HD Preview (only 2 credits) to test different presets!
***
## Step 3: Preview Your Result (Recommended)
Before spending 10 credits on the final conversion, use **HD Preview** to test your settings.
**Cost**: 2 credits (5x cheaper than full conversion!)
**What you get**:
* Full-resolution preview with watermark
* Zoom and pan controls
* Side-by-side comparison
* Verify settings before committing
Click the blue "HD Preview" button to start processing.
Processing typically takes:
* **Simple images**: 3-8 seconds
* **Medium complexity**: 8-15 seconds
* **Complex images**: 15-30 seconds
* **High-Fidelity preset**: 30-60 seconds
You'll see a loading indicator with the message "Generating preview\..."
Once complete, a modal window opens showing your vectorized preview:
**Preview features**:
* 🔍 **Zoom controls**: Inspect details at 400% zoom
* 👆 **Pan**: Click and drag to move around
* 🖼️ **Comparison slider**: See before/after side-by-side
* ✅ **Convert button**: Go straight to full conversion if satisfied
**Look for**:
* Are curves smooth and clean?
* Any jagged/stair-step edges?
* Sharp corners preserved?
**If not good**:
* Increase **Quality** to High or Ultra
* Lower **Detail** if too many small shapes
**Look for**:
* Main colors accurately captured?
* Gradients handled well?
* Any unwanted color shifts?
**If not good**:
* Increase **Colors** setting (try 64 or 256)
* Try a different preset
**Look for**:
* Important features preserved?
* Too much noise/speckling?
* Missing fine lines?
**If not good**:
* Increase **Detail** slider if losing features
* Decrease **Detail** if seeing noise
**Ask yourself**:
* Would I use this in my design?
* Does it match my expectations?
* Clean enough to edit in Figma?
**If not good**:
* Try a different **Preset**
* Adjust **Quality** and **Detail**
* Preview again (only 2 more credits)
If the preview isn't perfect, close the modal and tweak your settings:
**Solution**: Increase **Quality**
1. Move Quality slider to **High** or **Ultra**
2. Click HD Preview again (2 credits)
3. Compare results
**Why it works**: Higher quality = smoother, more precise curves
**Solution**: Decrease **Detail**
1. Move Detail slider LEFT (toward "Less")
2. Try Detail value of **30-40**
3. Preview again
**Why it works**: Lower detail removes small shapes (noise, JPG artifacts)
**Solution**: Increase **Colors**
1. Change Colors from dropdown (try **64** or **256**)
2. Preview again
3. Or try **Unlimited** for maximum color accuracy
**Why it works**: More colors = more accurate color representation
**Solution**: Increase **Detail** or switch Preset
1. Move Detail slider RIGHT (toward "More")
2. Try Detail value of **70-80**
3. Or switch to **High-Fidelity** preset
**Why it works**: Higher detail preserves smaller shapes and features
**Solution**: Change Draw Style or Preset
1. Go to **Style** section in settings
2. Change **Draw Style** to:
* **Fill** for solid shapes (default)
* **Stroke** for line outlines
* **Edges** for edge outlines only
3. Or switch to **Line Art** preset for stroke-based output
**Why it works**: Different draw styles create different vector types
**Preview is cheap!** Each preview only costs 2 credits vs 10 for full conversion. Don't be afraid to preview multiple times with different settings until you're happy!
If you're confident with your preset choice, you can skip HD Preview and go straight to conversion.
**When to skip**:
* You're familiar with the presets
* Simple image with predictable results
* You're okay with potential re-conversion
**When NOT to skip**:
* First time using a preset
* Complex or important image
* Unsure about settings
* Want to save credits (preview first = avoid re-conversion)
**Pro users** skip preview for routine conversions, but **new users** should always preview first to learn how settings affect results!
***
## Step 4: Convert to SVG
Once you're happy with the preview (or if you skipped preview), it's time for the final conversion!
**Cost**: 10 credits (no watermark)
**What happens**:
* Image is processed with your chosen settings
* High-quality SVG is generated
* Result automatically placed in Figma
* Your credit balance updates
Click the green "Convert to SVG" button at the bottom of the plugin.
**Don't have 10 credits?**
The plugin will automatically generate a **watermarked preview** for free. You can still see the result, but you'll need credits to get the clean, usable SVG.
[Purchase credits now →](/support/credits-pricing)
Processing time varies by image complexity:
| Image Type | Expected Time |
| ------------- | ------------- |
| Simple logo | 5-10 seconds |
| Illustration | 10-20 seconds |
| Line art | 15-25 seconds |
| High-Fidelity | 30-60 seconds |
The button shows "Converting..." and you'll see a progress indicator.
**Taking longer than 2 minutes?**
* Check your internet connection
* Try reducing Quality or Detail settings
* Complex images with High-Fidelity can take up to 90 seconds
* If it fails, you'll see an error message and credits will be refunded
When conversion completes, several things happen automatically:
✅ SVG is placed **next to your original image** on the canvas
✅ New SVG is **automatically selected** (ready to move/edit)
✅ Success notification appears: "✓ SVG converted successfully!"
✅ Your **credit balance updates** in the plugin
✅ Viewport **scrolls** to show both original and result
**Pro tip**: The original image stays untouched. Compare them side-by-side, then delete the original once you're satisfied!
***
## Step 5: Edit Your Vector in Figma
Your SVG is now a **fully editable Figma vector**! Here's what you can do:
**Make it match your design system**
Click on the vectorized SVG in your canvas
Double-click or press `Enter` to enter the group
Click on any shape inside the SVG
* Use the **Fill** picker in the right panel
* Or use your brand color styles
* Colors update instantly!
**Select all shapes of one color:**
1. Enter the SVG group
2. Click one shape with the color you want to change
3. `Cmd/Ctrl + Click` other shapes with same color
4. Change fill once for all selected
**Or use Find/Replace color** (Figma plugin) for bulk changes!
**Edit paths and adjust shapes**
Your SVG uses standard Figma vector tools:
* **Bend handles**: Adjust curves by dragging bezier handles
* **Add/delete points**: Double-click path to add, click point and Delete to remove
* **Vector networks**: Figma's advanced path editing
* **Boolean operations**: Union, Subtract, Intersect, Exclude
- **Smooth rough edges**: Select anchor point → Set to "Smooth" in properties
- **Simplify complex paths**: Right-click → Simplify (reduces points)
- **Combine shapes**: Select multiple → Boolean Union
- **Cut out shapes**: Select two → Boolean Subtract
**The magic of vectors!**
Try this:
1. Select your SVG
2. Resize to **10x** larger
3. Zoom in to 400%
4. **Still perfectly crisp!** 🎉
**Use cases**:
* 📱 Tiny mobile icons (16x16)
* 🖥️ Web graphics (any size)
* 🖨️ Large print materials
* 📺 Presentations and screens
**Power user techniques**
**Why**: Simplify editing by merging layers
1. Select your SVG
2. Right-click → **Flatten** (or `Cmd/Ctrl + E`)
3. Overlapping shapes merge into single paths
**Why**: Turn strokes into editable fills
1. Select stroke-based SVG (from Line Art preset)
2. Right-click → **Outline Stroke**
3. Strokes become fillable shapes
**Why**: Reuse across designs
1. Select your SVG
2. `Cmd/Ctrl + Alt + K` to create component
3. Add to your library
4. Use instances everywhere!
**Why**: Use in web projects
1. Select your SVG
2. Right-click → **Copy/Paste** → **Copy as SVG**
3. Paste into code editor
4. Or use **Export** panel for file export
***
## Congratulations! 🎉
You've successfully converted your first bitmap to vector! Your design is now:
**✓ Infinitely Scalable**
No quality loss at any size
**✓ Fully Editable**
Modify colors, shapes, and paths
**✓ Lightweight**
5-10x smaller than PNG
**✓ Production Ready**
Use in designs, web, print
***
## What's Next?
Now that you know the basics, level up your vectorization skills:
Deep dive into all 4 presets and when to use each
Learn Quality, Detail, Colors, and Style controls
Scenario-based workflows for logos, illustrations, and more
Custom palettes, stroke width, and power-user tips
Fix common issues and optimize results
Answers to frequently asked questions
***
## Common First-Time Issues
**Checklist**:
* ☐ Did you select a node with an **image fill**? (not text or shapes)
* ☐ Is the image fully loaded in Figma?
* ☐ Is it a PNG or JPG format? (not SVG, PDF, or video)
* ☐ Is the layer visible and unlocked?
**Solutions**:
1. Try **right-clicking** the image → Plugins → Vectorized (AI Vectorizer) - Image Tracer
2. Copy image, paste as fill on a rectangle, select rectangle
3. Refresh the plugin (`Cmd/Ctrl + R` in Figma)
4. Check [troubleshooting guide](/support/troubleshooting) for more help
**Possible causes**:
**HD Preview disabled**:
* Not enough credits (need 2)
* No image selected
* Plugin connection issue
**Convert to SVG disabled**:
* Not enough credits (need 10)
* No image selected
* Processing in progress
**Solutions**:
1. [Buy credits](/support/credits-pricing) if balance is 0
2. Make sure image is selected (see preview in plugin)
3. Check internet connection
4. Restart plugin if stuck
**Common causes and fixes**:
| Problem | Likely Cause | Solution |
| ------------- | ---------------------- | ----------------------------------------- |
| Jagged edges | Quality too low | Increase Quality to High/Ultra |
| Too many dots | Detail too high | Decrease Detail to 30-40 |
| Wrong colors | Colors setting too low | Increase Colors to 64/256 |
| Lost details | Detail too low | Increase Detail to 70-80 |
| Wrong style | Wrong preset | Try different preset or change Draw Style |
**Best practice**: Use HD Preview (2 credits) to test before full conversion!
**Expected times**:
* Simple images: 5-15 seconds
* Medium complexity: 15-30 seconds
* High-Fidelity preset: 30-90 seconds
**If longer than 2 minutes**:
1. Check internet connection
2. Try refreshing Figma
3. Reduce image complexity:
* Lower Quality to Standard
* Decrease Detail
* Use smaller original image
4. Avoid High-Fidelity preset for testing
**Still stuck?** Contact support with details about your image size and settings.
**This shouldn't happen!** But if it does:
1. **Check canvas**: SVG might be placed far from viewport
* Press `Shift + 1` to zoom to see all
* Look for new layer in layers panel
2. **Check Figma notifications**: Error message may appear
3. **Wait 60 seconds**: Network delay possible
4. **If truly lost**: Contact support immediately
* Include timestamp
* Screenshot of credit balance
* We'll refund lost credits
**Note**: If conversion fails due to error, credits are automatically refunded within 1 minute.
**Small differences are normal** due to:
* Preview is PNG representation
* Final SVG has precise vector math
* Figma rendering vs web rendering
**If drastically different**:
1. Check if you changed settings after preview
2. Make sure you clicked Convert (not Preview again)
3. Try converting again with same settings
4. Contact support if consistently different
**Tip**: Previews are 95%+ accurate. Minor differences in fine details are expected.
***
Check our comprehensive FAQ and troubleshooting guide →
**Feedback welcome!** Did this guide help you? Have suggestions? Email us at [zouwenqiang678@gmail.com](mailto:zouwenqiang678@gmail.com)
## Your First Vectorization in 5 Minutes
Follow this guide to convert your first bitmap image into a beautiful, editable SVG vector. No prior experience needed!
**Before you begin, make sure you have:**
* ✓ Vectorized (AI Vectorizer) - Image Tracer installed ([installation guide](/getting-started/installation))
* ✓ At least 10 credits in your account ([buy credits](/support/credits-pricing))
* ✓ A bitmap image (PNG or JPG) in your Figma file to vectorize
Don't have an image? Use any screenshot or photo already in your Figma file to follow along.
***
## Step 1: Select Your Image
Click on any **bitmap/raster image** in your Figma canvas. The plugin works with:
* 🖼️ **Imported PNG/JPG files**
* 📋 **Pasted screenshots**
* 🎨 **Nodes with image fills**
* 📷 **Drag-and-dropped photos**
**What kind of images work best?**
* ✅ **Logos and icons** - Clean, simple shapes
* ✅ **Flat illustrations** - Limited colors, no gradients
* ✅ **Line drawings** - Sketches and outlines
* ⚠️ **Photos** - Work, but may need High-Fidelity preset
* ❌ **Text** - Better to use Figma text layers directly
Once you've selected an image, the plugin automatically detects it. You'll see:
✓ Image preview appears in the plugin's canvas area (center-right)
✓ "HD Preview" button becomes active (changes from disabled to blue)
✓ "Convert to SVG" button is enabled at the bottom
✓ Settings panel remains available on the left
**Not seeing the image preview?**
Common issues and fixes:
* **No image fill**: Make sure the selected node actually contains an image (not just a solid color fill)
* **Image not loaded**: Wait for the image to fully load in Figma first
* **Wrong format**: Plugin works with PNG/JPG only (not SVG, PDF, or video)
* **Locked/Hidden layer**: Unlock and make visible
**Still not working?** Try:
1. Right-click the image → Copy
2. Create a new rectangle (`R` key)
3. Paste the image as fill (`Cmd/Ctrl + V`)
4. Select the rectangle
For best results, consider these quick optimizations:
If your image has a background you don't need, remove it before vectorizing:
* Use Figma's background removal tool
* Or use a service like remove.bg
* Clean backgrounds produce cleaner vectors
For sketches and line art:
* Adjust brightness/contrast in Figma
* Makes lines more defined
* Results in cleaner vector paths
Remove unnecessary space:
* Frame the main subject tightly
* Reduces processing time
* Focuses vectorization on what matters
These optimizations are optional! The plugin works great with raw images too. Feel free to skip if you're just testing.
***
## Step 2: Choose a Preset
Presets are optimized configurations for different image types. Pick the one that matches your image:
**Best for**: Brand logos, simple icons, badges, emblems
* Aggressive noise removal
* Limited colors (16)
* Clean, sharp edges
* Small file size
* Converting company logos
* App/web icons
* Simple graphics
* 1-5 main colors
**Settings**: Standard quality • Low detail (30) • 16 colors • Fill shapes
**Before**: Pixelated JPEG logo from client's website
**After**: Clean, editable SVG with perfect edges
**File size**: 240 KB → 12 KB (95% reduction!)
**Best for**: Flat illustrations, UI graphics, artwork, patterns
⭐ **Recommended for 90% of users - start here if unsure!**
* Balanced detail preservation
* Rich colors (32)
* Moderate noise filtering
* Optimal file size
* Flat design illustrations
* UI components
* Marketing graphics
* **Not sure which to pick**
**Settings**: Standard quality • Medium detail (50) • 32 colors • Fill shapes
**Before**: Flat illustration with multiple colors
**After**: Editable vector, all colors preserved, smooth shapes
**Perfect for**: Design systems, landing pages, presentations
**Best for**: Hand-drawn sketches, technical drawings, coloring pages
* Uses **strokes** (not fills)
* High precision
* Preserves fine lines
* Adjustable line weight
* Scanned sketches
* Wireframes
* Coloring book pages
* You'll add colors later
**Settings**: High quality • High detail (70) • 8 colors • **Stroke shapes**
**Before**: Scanned pencil sketch
**After**: Clean vector strokes, ready for coloring
**Bonus**: Adjust stroke width after conversion in Figma!
**Best for**: Complex artwork, detailed illustrations, photo-realistic images
* Maximum detail preservation
* Full color spectrum (256)
* Minimal noise removal
* Ultra-precise curves
* Complex illustrations
* Artistic pieces
* Quality > file size
* Other presets lose details
**Settings**: Ultra quality • Very high detail (80) • 256 colors • Fill shapes
**Important trade-offs:**
* ⏱️ **Slower**: 30-60 seconds processing time
* 📦 **Larger files**: 500 KB - 2 MB (vs 50-200 KB for Illustration)
* 🎨 **Harder to edit**: More complex paths
* 💰 **Same cost**: Still 10 credits
**Recommendation**: Try Illustration first, upgrade if needed!
**Still not sure which preset to choose?**
* Simple graphics (logos, icons) → **Logo**
* **Don't know / General use** → **Illustration** ⭐
* Lines only (sketches) → **Line Art**
* Very complex / detailed → Try **Illustration** first, then **High-Fidelity** if needed
**Pro tip**: Use HD Preview (only 2 credits) to test different presets!
***
## Step 3: Preview Your Result (Recommended)
Before spending 10 credits on the final conversion, use **HD Preview** to test your settings.
**Cost**: 2 credits (5x cheaper than full conversion!)
**What you get**:
* Full-resolution preview with watermark
* Zoom and pan controls
* Side-by-side comparison
* Verify settings before committing
Click the blue "HD Preview" button to start processing.
Processing typically takes:
* **Simple images**: 3-8 seconds
* **Medium complexity**: 8-15 seconds
* **Complex images**: 15-30 seconds
* **High-Fidelity preset**: 30-60 seconds
You'll see a loading indicator with the message "Generating preview\..."
Once complete, a modal window opens showing your vectorized preview:
**Preview features**:
* 🔍 **Zoom controls**: Inspect details at 400% zoom
* 👆 **Pan**: Click and drag to move around
* 🖼️ **Comparison slider**: See before/after side-by-side
* ✅ **Convert button**: Go straight to full conversion if satisfied
**Look for**:
* Are curves smooth and clean?
* Any jagged/stair-step edges?
* Sharp corners preserved?
**If not good**:
* Increase **Quality** to High or Ultra
* Lower **Detail** if too many small shapes
**Look for**:
* Main colors accurately captured?
* Gradients handled well?
* Any unwanted color shifts?
**If not good**:
* Increase **Colors** setting (try 64 or 256)
* Try a different preset
**Look for**:
* Important features preserved?
* Too much noise/speckling?
* Missing fine lines?
**If not good**:
* Increase **Detail** slider if losing features
* Decrease **Detail** if seeing noise
**Ask yourself**:
* Would I use this in my design?
* Does it match my expectations?
* Clean enough to edit in Figma?
**If not good**:
* Try a different **Preset**
* Adjust **Quality** and **Detail**
* Preview again (only 2 more credits)
If the preview isn't perfect, close the modal and tweak your settings:
**Solution**: Increase **Quality**
1. Move Quality slider to **High** or **Ultra**
2. Click HD Preview again (2 credits)
3. Compare results
**Why it works**: Higher quality = smoother, more precise curves
**Solution**: Decrease **Detail**
1. Move Detail slider LEFT (toward "Less")
2. Try Detail value of **30-40**
3. Preview again
**Why it works**: Lower detail removes small shapes (noise, JPG artifacts)
**Solution**: Increase **Colors**
1. Change Colors from dropdown (try **64** or **256**)
2. Preview again
3. Or try **Unlimited** for maximum color accuracy
**Why it works**: More colors = more accurate color representation
**Solution**: Increase **Detail** or switch Preset
1. Move Detail slider RIGHT (toward "More")
2. Try Detail value of **70-80**
3. Or switch to **High-Fidelity** preset
**Why it works**: Higher detail preserves smaller shapes and features
**Solution**: Change Draw Style or Preset
1. Go to **Style** section in settings
2. Change **Draw Style** to:
* **Fill** for solid shapes (default)
* **Stroke** for line outlines
* **Edges** for edge outlines only
3. Or switch to **Line Art** preset for stroke-based output
**Why it works**: Different draw styles create different vector types
**Preview is cheap!** Each preview only costs 2 credits vs 10 for full conversion. Don't be afraid to preview multiple times with different settings until you're happy!
If you're confident with your preset choice, you can skip HD Preview and go straight to conversion.
**When to skip**:
* You're familiar with the presets
* Simple image with predictable results
* You're okay with potential re-conversion
**When NOT to skip**:
* First time using a preset
* Complex or important image
* Unsure about settings
* Want to save credits (preview first = avoid re-conversion)
**Pro users** skip preview for routine conversions, but **new users** should always preview first to learn how settings affect results!
***
## Step 4: Convert to SVG
Once you're happy with the preview (or if you skipped preview), it's time for the final conversion!
**Cost**: 10 credits (no watermark)
**What happens**:
* Image is processed with your chosen settings
* High-quality SVG is generated
* Result automatically placed in Figma
* Your credit balance updates
Click the green "Convert to SVG" button at the bottom of the plugin.
**Don't have 10 credits?**
The plugin will automatically generate a **watermarked preview** for free. You can still see the result, but you'll need credits to get the clean, usable SVG.
[Purchase credits now →](/support/credits-pricing)
Processing time varies by image complexity:
| Image Type | Expected Time |
| ------------- | ------------- |
| Simple logo | 5-10 seconds |
| Illustration | 10-20 seconds |
| Line art | 15-25 seconds |
| High-Fidelity | 30-60 seconds |
The button shows "Converting..." and you'll see a progress indicator.
**Taking longer than 2 minutes?**
* Check your internet connection
* Try reducing Quality or Detail settings
* Complex images with High-Fidelity can take up to 90 seconds
* If it fails, you'll see an error message and credits will be refunded
When conversion completes, several things happen automatically:
✅ SVG is placed **next to your original image** on the canvas
✅ New SVG is **automatically selected** (ready to move/edit)
✅ Success notification appears: "✓ SVG converted successfully!"
✅ Your **credit balance updates** in the plugin
✅ Viewport **scrolls** to show both original and result
**Pro tip**: The original image stays untouched. Compare them side-by-side, then delete the original once you're satisfied!
***
## Step 5: Edit Your Vector in Figma
Your SVG is now a **fully editable Figma vector**! Here's what you can do:
**Make it match your design system**
Click on the vectorized SVG in your canvas
Double-click or press `Enter` to enter the group
Click on any shape inside the SVG
* Use the **Fill** picker in the right panel
* Or use your brand color styles
* Colors update instantly!
**Select all shapes of one color:**
1. Enter the SVG group
2. Click one shape with the color you want to change
3. `Cmd/Ctrl + Click` other shapes with same color
4. Change fill once for all selected
**Or use Find/Replace color** (Figma plugin) for bulk changes!
**Edit paths and adjust shapes**
Your SVG uses standard Figma vector tools:
* **Bend handles**: Adjust curves by dragging bezier handles
* **Add/delete points**: Double-click path to add, click point and Delete to remove
* **Vector networks**: Figma's advanced path editing
* **Boolean operations**: Union, Subtract, Intersect, Exclude
- **Smooth rough edges**: Select anchor point → Set to "Smooth" in properties
- **Simplify complex paths**: Right-click → Simplify (reduces points)
- **Combine shapes**: Select multiple → Boolean Union
- **Cut out shapes**: Select two → Boolean Subtract
**The magic of vectors!**
Try this:
1. Select your SVG
2. Resize to **10x** larger
3. Zoom in to 400%
4. **Still perfectly crisp!** 🎉
**Use cases**:
* 📱 Tiny mobile icons (16x16)
* 🖥️ Web graphics (any size)
* 🖨️ Large print materials
* 📺 Presentations and screens
**Power user techniques**
**Why**: Simplify editing by merging layers
1. Select your SVG
2. Right-click → **Flatten** (or `Cmd/Ctrl + E`)
3. Overlapping shapes merge into single paths
**Why**: Turn strokes into editable fills
1. Select stroke-based SVG (from Line Art preset)
2. Right-click → **Outline Stroke**
3. Strokes become fillable shapes
**Why**: Reuse across designs
1. Select your SVG
2. `Cmd/Ctrl + Alt + K` to create component
3. Add to your library
4. Use instances everywhere!
**Why**: Use in web projects
1. Select your SVG
2. Right-click → **Copy/Paste** → **Copy as SVG**
3. Paste into code editor
4. Or use **Export** panel for file export
***
## Congratulations! 🎉
You've successfully converted your first bitmap to vector! Your design is now:
**✓ Infinitely Scalable**
No quality loss at any size
**✓ Fully Editable**
Modify colors, shapes, and paths
**✓ Lightweight**
5-10x smaller than PNG
**✓ Production Ready**
Use in designs, web, print
***
## What's Next?
Now that you know the basics, level up your vectorization skills:
Deep dive into all 4 presets and when to use each
Learn Quality, Detail, Colors, and Style controls
Scenario-based workflows for logos, illustrations, and more
Custom palettes, stroke width, and power-user tips
Fix common issues and optimize results
Answers to frequently asked questions
***
## Common First-Time Issues
**Checklist**:
* ☐ Did you select a node with an **image fill**? (not text or shapes)
* ☐ Is the image fully loaded in Figma?
* ☐ Is it a PNG or JPG format? (not SVG, PDF, or video)
* ☐ Is the layer visible and unlocked?
**Solutions**:
1. Try **right-clicking** the image → Plugins → Vectorized (AI Vectorizer) - Image Tracer
2. Copy image, paste as fill on a rectangle, select rectangle
3. Refresh the plugin (`Cmd/Ctrl + R` in Figma)
4. Check [troubleshooting guide](/support/troubleshooting) for more help
**Possible causes**:
**HD Preview disabled**:
* Not enough credits (need 2)
* No image selected
* Plugin connection issue
**Convert to SVG disabled**:
* Not enough credits (need 10)
* No image selected
* Processing in progress
**Solutions**:
1. [Buy credits](/support/credits-pricing) if balance is 0
2. Make sure image is selected (see preview in plugin)
3. Check internet connection
4. Restart plugin if stuck
**Common causes and fixes**:
| Problem | Likely Cause | Solution |
| ------------- | ---------------------- | ----------------------------------------- |
| Jagged edges | Quality too low | Increase Quality to High/Ultra |
| Too many dots | Detail too high | Decrease Detail to 30-40 |
| Wrong colors | Colors setting too low | Increase Colors to 64/256 |
| Lost details | Detail too low | Increase Detail to 70-80 |
| Wrong style | Wrong preset | Try different preset or change Draw Style |
**Best practice**: Use HD Preview (2 credits) to test before full conversion!
**Expected times**:
* Simple images: 5-15 seconds
* Medium complexity: 15-30 seconds
* High-Fidelity preset: 30-90 seconds
**If longer than 2 minutes**:
1. Check internet connection
2. Try refreshing Figma
3. Reduce image complexity:
* Lower Quality to Standard
* Decrease Detail
* Use smaller original image
4. Avoid High-Fidelity preset for testing
**Still stuck?** Contact support with details about your image size and settings.
**This shouldn't happen!** But if it does:
1. **Check canvas**: SVG might be placed far from viewport
* Press `Shift + 1` to zoom to see all
* Look for new layer in layers panel
2. **Check Figma notifications**: Error message may appear
3. **Wait 60 seconds**: Network delay possible
4. **If truly lost**: Contact support immediately
* Include timestamp
* Screenshot of credit balance
* We'll refund lost credits
**Note**: If conversion fails due to error, credits are automatically refunded within 1 minute.
**Small differences are normal** due to:
* Preview is PNG representation
* Final SVG has precise vector math
* Figma rendering vs web rendering
**If drastically different**:
1. Check if you changed settings after preview
2. Make sure you clicked Convert (not Preview again)
3. Try converting again with same settings
4. Contact support if consistently different
**Tip**: Previews are 95%+ accurate. Minor differences in fine details are expected.
***
Check our comprehensive FAQ and troubleshooting guide →
**Feedback welcome!** Did this guide help you? Have suggestions? Email us at [zouwenqiang678@gmail.com](mailto:zouwenqiang678@gmail.com)